Photon Publish and Subscription Events
This post introduces the use of the Particle.publish() and Particle.subscribe() events to enable photon devices to communicate via the Particle Cloud. This post acts to lay the groundwork for a series of postings that will enable the use of the particle.io platform to formulate a variety of IOT devices.
Particle.publish()
The Particle.publish() command allows you to trigger an event through the Particle Cloud. This means that any hook, application or device that is registered to listen to the event will be notified when it is called.
Calling Particle.publish() when the device is not connected to the cloud will not result in an event being published. This is indicated by the return success code of false. This in turn enables some form of notification to be made if the publish event fails.
Code 1: The Particle.publish() Method
Currently, a Particle device can publish at rate of about 1 event/sec, with bursts of up to 4 allowed in 1 second. A back to back burst of 4 messages will take the device 4 seconds to recover. Code 1 above demonstrates (descriptive) the use of the Particle.publish() command.
Particle.subscribe()
The Particle.subscribe() command allows you to register or subscribe for a notification from a specific Particle.publish() event. This allows devices to talk to each other very easily.
Events received via the subscription are passed to a handler function; itself registered when the subscription is made.
A subscription handler (code 2) must return void and take two arguments, both of which are C strings (or const char *).The first argument is the full name of the published event. The second argument (which may be NULL) is any data that came along with the event.
Code 2: The Particle.subscribe() Method
As with Particle.publish(); the Particle.subscribe() command returns a bool indicating its success. A subscription can be registered when the device is not connected to the cloud. In this instance the subscription will be automatically registered with the cloud next time the device connects.
A device can register up to 4 event handlers. This means you can call Particle.subscribe() a maximum of 4 times; after that it will always return false.
A Worked Example
The following example demonstrates the use of both the publish and subscribe commands by allowing for a button press and release on one device to trigger the turning on and off of a LED on situated on a separate device.
The Push-Button Circuit
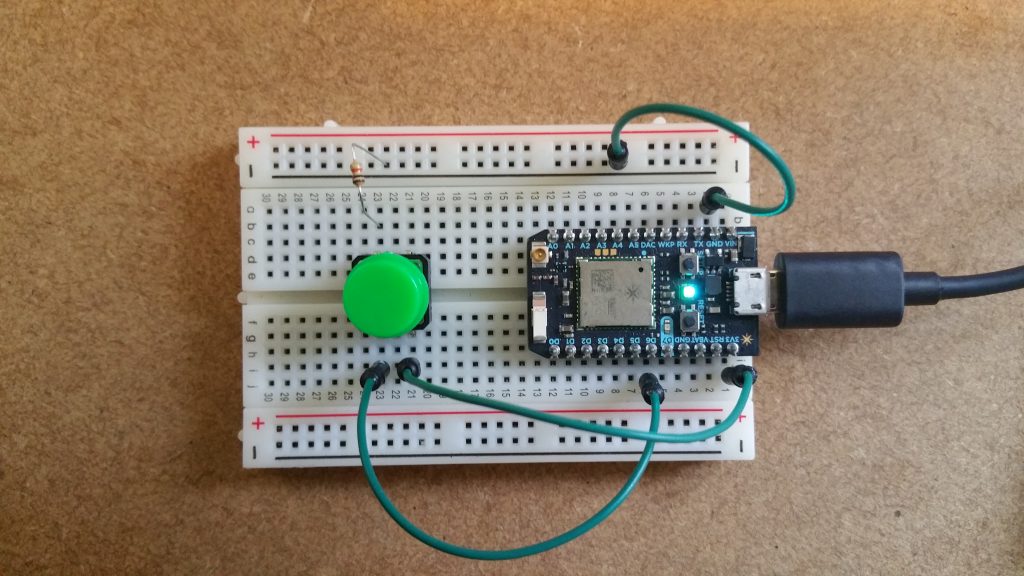
Figure 1 shows a simple push-button circuit. The Photons D6 pin is connected to one leg of the push-button. That same leg of the button connects through a pull-down resistor (here 10K ohm) to ground. The other leg of the button connects to the Photons 3v3 supply.
Figure 1: A simple push-button circuit
When the push-button is open (unpressed) there is no connection between the two legs of the push-button, so the pin is connected to ground (through the pull-down resistor) and we read a LOW. When the button is closed (pressed), it makes a connection between its two legs, connecting the pin to 5 volts, so that we read a HIGH. This means that we can use the change from HIGH to LOW to trigger our Publish event.
The LED Output Circuit
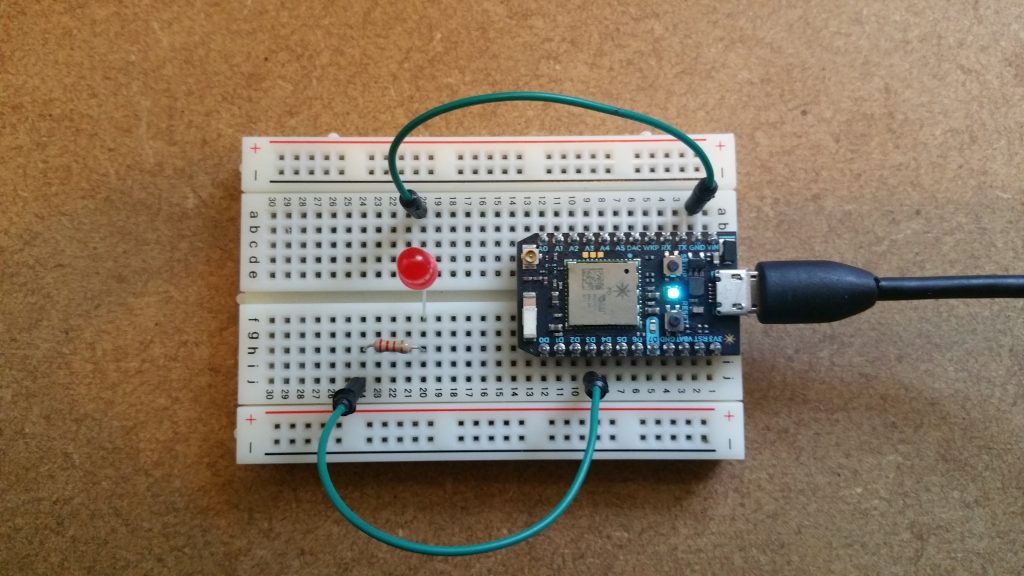
Figure 2 shows a simple LED Circuit. The Photons D3 pin is connected to the positive leg of the LED via a 22K resistor. The negative leg is then simply connected to ground. Use of the resistor is to prevent the LED from burning out.
Figure 2: A simple LED output circuit
This setup enables us to control the LED by sending either a HIGH or LOW value to the pin. This in turn means that we can then use the values received via the subscription to determine whether we set the pin LOW or HIGH and thus effectively turning the LED ON or OFF.
The (Push-Button) Publish Code
The following code block provides the full source code for the push button event publisher. All the code does is read the pin connected to the push button (D6) each loop. If the button is down then a down event (“on”) is published. If up, then an up (“off”) event is published.
The flag “pressed” is used to ensure that only the first trigger and release of the button is counted.
Code 3: The (Push-Button) Publish Code
The (LED Output) Subscribe Code
The subscription code is much simpler than that of the publish code. All we are doing here is initialising the led pin (D3) as an output, and then setting it to LOW. We then subscribe to the event ledToggle and pass the handler myHandler at the same time.
The following code block provides the full source code for the led subscription.
Code 4: The (LED Output) Subscribe Code
The handler is triggered each time the event is Published and depending on if the data sent equates to “on” or “off” the status of the LED is updated accordingly.
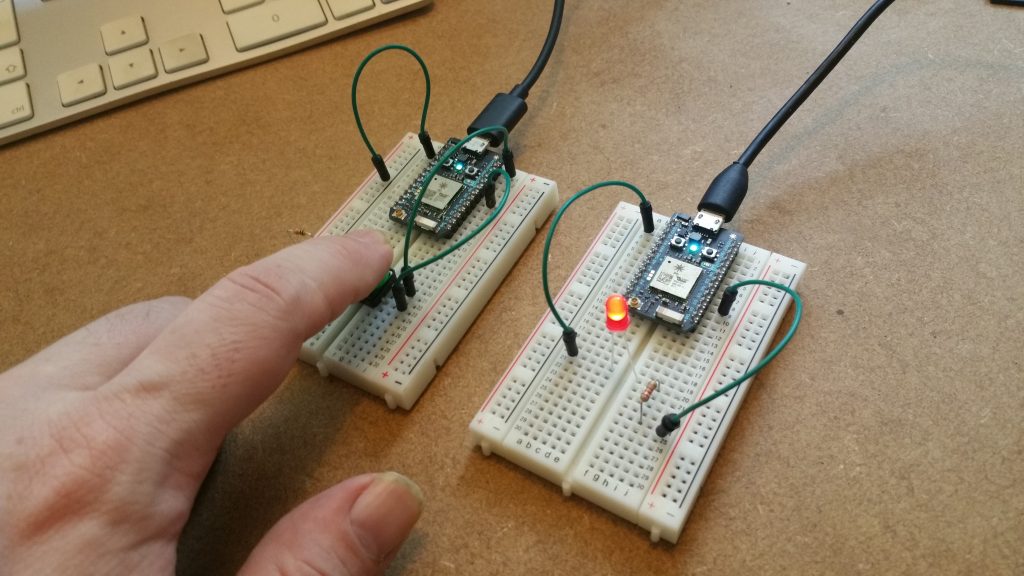
Figure 3: Both circuits working together
The above image (Figure 3) shows the system in action. As the button is pressed; the other circuits LED lights. A copy of the full source code can be found here. A copy of this post published via the IoST Project can be found here.


