Unity3D Serialport Script
This post presents a script and or prefab developed to allow drag and drop capability for serial communication within the Unity3D game development ecosystem. This in turn allows for the use of custom gaming controllers and hardware developed on platforms such as Arduino and Netduino within Unity applications.
The script is included at the end of the post and is also available for download. As always it is fully commented so that you can hopefully easily work out what is going on with the code.
Events Update 06.03.2014
Please note that his script has been updated to both include event triggers and the removal of the threaded update loop. For more information please see the post: Adding Events to the Serialport Script.
About the Script & Prefab
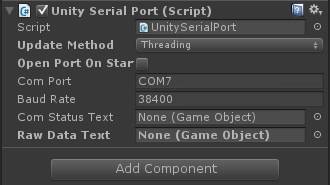
All you need to do in order to make use of the script and or prefab is drop it onto your scene. Once done this will make a gizmo appear that looks like an old style SerialPort (see featured image, left). By clicking on the prefab in the scene you will then be able to customize the ports setting via the unity inspector panel (fig 1).
The customizable properties include both the name of the system SerialPort, it’s BaudRate and a boolean that can be toggled to allow for the serial port to be initialized or not upon start up of the application.
Figure 1: The Available Serialport Properties
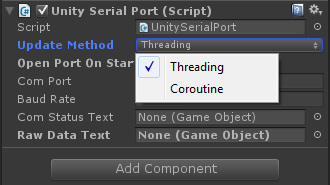
Also made available to the editor is the ability to select which of two methods, threading or coroutine, that you would like to use to listen for incoming serial data (fig 2).
Figure 2: The Available Listen Update Methods
If you decide not to have the port initialize on startup then you can initialize the port by making a call to the function OpenSerialPort(). I have included a static reference of the script called Instance that is initialized on the scripts Awake() function. This means that you can call the OpenSerialPort() function from any other script via a static instance (Code 1, Option A), or via a predefined property call (Code 1, Option B). Similarly, the port can be closed again via calling CloseSerialPort().
// For use with Option B
UnitySerialPort port;

void Start()
{
    // Option A
    UnitySerialPort.Instance.OpenSerialPort();

    // Option B
    port = UnitySerialPort.Instance;
}

void Update()
{
    if (Input.GetKeyDown("space"))
    { port.OpenSerialPort(); }
}
Code 1: Open via defined property or static instance
The final two fields are optional placeholders for two guiText objects. These references mean that all you need to do to see both the status of the port, and any incoming data, is to drop a guiText object onto them.
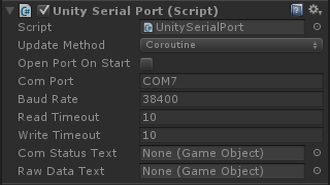
Figure 3: Public Read & Write Timeouts
Timeout Update 25.02.14
I have just updated the code to also include access to the SerialPort’s timeout properties (fig 3).
These are needed if you have an instance of the port open in Coroutine mode and have no data being sent to the port. In this instance unless the read timeout is set then the read will never complete.
The Read and Write timeout properties both represent the milliseconds before a time-out occurs when a read operation does not finish (I have also updated the script and download too). Just in case it may be useful for you more information can be found here.
Determining Available Ports
Included with the script is also a function which can be used to obtain a list of all the available ports on the running system. PopulateComPorts() is a simple function that just ties into the .net framework’s SerialPort.GetPortNames Method. The function populates an ArrayList with a string value of each port that is attached to the systems name. I usually utilize this with either a ComboBox (Winform) or for Unity as an expanding list of buttons embedded within a GUILayout Scrollview.
A little bit about Threading and Coroutine
In order to ensure that the reading and sending of data by the serialport does not impact upon frame-rate and or playback of Unity we need to either employ a separate Thread or Coroutine to run it on. This is because when a function is called, it runs to completion before returning. The result of this is that any action taking place in a function must happen within a single frame update; thus if we have a long read or write operation the frame/game would be held up until they have completed.
The threading method avoids any hold up of the game via employing a separate thread to run the SerialPorts read operations. This means that the reading of the port can be run in parallel. However as Unity runs on so many platforms, some of which don’t support multiple threads we also need another method, the Coroutine.
A coroutine is like a function which has the ability to pause its execution and return control to the Unity. It then resumes its execution on the next frame from where it left off.
Events Update 06.03.2014
Please note that his script has been updated to both include event triggers and the removal of the threaded update loop. For more information please see the post: Adding Events to the Serialport Script. With that said, please continue as everything else is still relevant.
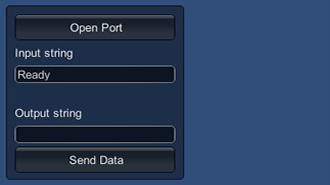
Figure 4: The provided GUI
Usage Demonstration Prefab
In addition to the SerialPort prefab, the download also includes another prefab which renders a simple GUI that can be used read incoming data and send data via the port.
When dropped onto your scene this will show up as another Gizmo which looks like a computer monitor (see featured image).
That’s all there is too it really. The only other thing to mention is that I have also included a couple of example output calls within the scripts Update() method (Code 2). These are directly compatible with my simple serial string parsing tutorial example to get you up and running in no time.
// Example of sending space press event to arduino
if (Input.GetKeyDown("space"))
{ SerialPort.WriteLine(""); }

// Example of sending key 1 press event to arduino.
// The "A,1" string will call functionA and pass a
// char value of 1
if (Input.GetKeyDown(KeyCode.Alpha1))
{ SerialPort.WriteLine("A,1"); }

// Example of sending key 1 press event to arduino.
// The "A,2" string will call functionA and pass a
// char value of 2
if (Input.GetKeyDown(KeyCode.Alpha2))
{ SerialPort.WriteLine("A,2"); }
Code 2: Example output calls
The above calls are tied to the 1,2 and space keys and can be triggered by clicking off the GUI to give the game focus and then via respective key-press.
Using the Code & Prefabs
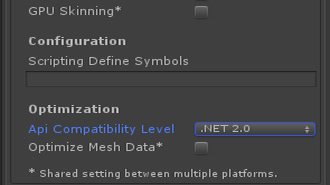
As previously stated all you need to do in order to use the port is drop the prefab into the scene and set the properties accordingly. There are however a few gotchas. Firstly in order to be able to utilize the SerialPort functionality of .net you will need to ensure that your Unity project is set to full .net 2.0 compatibility rather than the standard subset. This can be achieved via the PlayerSettings inspector panel as shown in figure 5.
Figure 5: PlayerSettings inspector panel
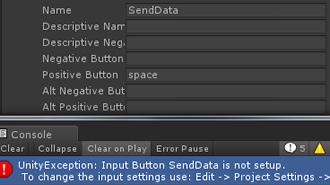
The second is that I have set up a custom button within the GUI script called SendData, so if you get the error as shown in figure 6 you either just need to add one or comment out the Input code at the bottom of the GUIManager scripts update method.
Figure 6: SendData button error
As promised the code for the SerialPort is included below. Those of you that would like a copy of complete example, one can be downloaded from here.
<pre class="brush: csharp; collapse: true; light: false; title: ; toolbar: true; notranslate" title="">

// <copyright file="UnitySerialPort.cs" company="dyadica.co.uk">
// Copyright (c) 2010, 2014 All Right Reserved, http://www.dyadica.co.uk

// This source is subject to the dyadica.co.uk Permissive License.
// Please see the /permissive-license file for more information.
// All other rights reserved.

// THIS CODE AND INFORMATION ARE PROVIDED "AS IS" WITHOUT WARRANTY OF ANY
// KIND, EITHER EXPRESSED OR IMPLIED, INCLUDING BUT NOT LIMITED TO THE
// IMPLIED WARRANTIES OF MERCHANTABILITY AND/OR FITNESS FOR A
// PARTICULAR PURPOSE.
//
// </copyright>

// <author>SJB</author>
// <email>SJB@dyadica.co.uk</email>
// <date>04.09.2013</date>
// <summary>A MonoBehaviour type class containing several functions which can be utilised
// to perform serial communication within Unity3D</summary>

using UnityEngine;
using System.Collections;

using System.IO;
using System.IO.Ports;
using System;

using System.Threading;

public class UnitySerialPort : MonoBehaviour
{
    // Init a static reference if script is to be accessed by others when used in a
    // none static nature eg. its dropped onto a gameObject. The use of "Instance"
    // allows access to public vars as such as those available to the unity editor.
    public static UnitySerialPort Instance;

    #region Properties

    // The serial port
    public SerialPort SerialPort;

    // The script update can run as either a seperate thread
    // or as a standard coroutine. This can be selected via
    // the unity editor.

    public enum LoopUpdateMethod
    { Threading, Coroutine }

    // This is the public property made visible in the editor.
    public LoopUpdateMethod UpdateMethod =
        LoopUpdateMethod.Threading;

    // Thread used to recieve and send serial data
    private Thread serialThread;

    // List of all baudrates available to the arduino platform
    private ArrayList baudRates =
        new ArrayList() { 300, 600, 1200, 2400, 4800, 9600, 14400, 19200, 28800, 38400, 57600, 115200 };

    // List of all com ports available on the system
    private ArrayList comPorts =
        new ArrayList();

    // If set to true then open the port when the start
    // event is called.
    public bool OpenPortOnStart = false;

    // Holder for status report information
    private string portStatus = "";
    public string PortStatus
    {
        get { return portStatus; }
        set { portStatus = value; }
    }

    // Current com port and set of default
    public string ComPort = "COM5";

    // Current baud rate and set of default
    public int BaudRate = 38400;

    // Timeout value - This is needed to force
    // the Coroutine method to end a read if no
    // data is being sent to the port.
    public int ReadTimeout = 10;

    // Write timeout value
    public int WriteTimeout = 10;

    // Property used to run/keep alive the serial thread loop
    private bool isRunning = false;
    public bool IsRunning
    {
        get { return isRunning; }
        set { isRunning = value; }
    }

    // Set the gui to show ready
    private string rawData = "Ready";
    public string RawData
    {
        get { return rawData; }
        set { rawData = value; }
    }

    // Storage for parsed incoming data
    private string[] chunkData;
    public string[] ChunkData
    {
        get { return chunkData; }
        set { chunkData = value; }
    }

    // Refs populated by the editor inspector for default gui
    // functionality if script is to be used in a non-static
    // context.
    public GameObject ComStatusText;

    public GameObject RawDataText;

    #endregion Properties

    #region Unity Frame Events

    /// <summary>
    /// The awake call is used to populate refs to the gui elements used in this
    /// example. These can be removed or replaced if needed with bespoke elements.
    /// This will not affect the functionality of the system. If we are using awake
    /// then the script is being run non staticaly ie. its initiated and run by
    /// being dropped onto a gameObject, thus enabling the game loop events to be
    /// called e.g. start, update etc.
    /// </summary>
    void Awake()
    {
        // Define the script Instance
        Instance = this;

        // If we have used the editor inspector to populate any included gui
        // elements then lets initiate them and set some default values.

        // Details if the port is open or closed
        if (ComStatusText != null)
        { ComStatusText.guiText.text = "ComStatus: Closed"; }
    }

    void GameObjectSerialPort_DataRecievedEvent(string[] Data, string RawData)
    {
        print("Data Recieved: " + RawData);
    }

    /// <summary>
    /// The start call is used to populate a list of available com ports on the
    /// system. The correct port can then be selected via the respective guitext
    /// or a call to UpdateComPort();
    /// </summary>
    void Start()
    {
        // Population of comport list via system.io.ports
        PopulateComPorts();

        // If set to true then open the port. You must
        // ensure that the port is valid etc. for this!
        if (OpenPortOnStart) { OpenSerialPort(); }
    }

    /// <summary>
    /// The update frame call is used to provide caps for sending data to the arduino
    /// triggered via keypress. This can be replaced via use of the static functions
    /// SendSerialData() & SendSerialDataAsLine(). Additionaly this update uses the
    /// RawData property to update the gui. Again this can be removed etc.
    /// </summary>
    void Update()
    {
        // Check if the serial port exists and is open
        if (SerialPort == null || SerialPort.IsOpen == false) { return; }

        // Example calls from system to the arduino. For more detail on the
        // structure of the calls see: /journal/simple-serial-string-parsing/
        try
        {
            // Example of sending space press event to arduino
            if (Input.GetKeyDown("space"))
            { SerialPort.WriteLine(""); }

            // Example of sending key 1 press event to arduino.
            // The "A,1" string will call functionA and pass a
            // char value of 1
            if (Input.GetKeyDown(KeyCode.Alpha1))
            { SerialPort.WriteLine("A,1"); }

            // Example of sending key 1 press event to arduino.
            // The "A,2" string will call functionA and pass a
            // char value of 2
            if (Input.GetKeyDown(KeyCode.Alpha2))
            { SerialPort.WriteLine("A,2"); }
        }
        catch (Exception ex)
        {
            // Failed to send serial data
            Debug.Log("Error 6: " + ex.Message.ToString());
        }

        try
        {
            // If we have set a GUI Text object then update it. This can only be
            // run on the thread that initialised the object thus cnnot be run
            // in the ParseSerialData() call below... Unless run as a coroutine!

            // I have also included a raw data example which is called from a
            // seperate script... see RawDataExample.cs

            if (RawDataText != null)
                RawDataText.guiText.text = RawData;
        }
        catch (Exception ex)
        {
            // Failed to update serial data
            Debug.Log("Error 7: " + ex.Message.ToString());
        }
    }

    /// <summary>
    /// Clean up the thread and close the port on application close event.
    /// </summary>
    void OnApplicationQuit()
    {
        // Call to cloase the serial port
        CloseSerialPort();

        Thread.Sleep(500);

        if (UpdateMethod == LoopUpdateMethod.Threading)
        {
            // Call to end and cleanup thread
            StopSerialThread();
        }

        if (UpdateMethod == LoopUpdateMethod.Coroutine)
        {
            // Call to end and cleanup coroutine
            StopSerialCoroutine();
        }

        Thread.Sleep(500);
    }

    #endregion Unity Frame Events

    #region Object Serial Port

    /// <summary>
    /// Opens the defined serial port and starts the serial thread used
    /// to catch and deal with serial events.
    /// </summary>
    public void OpenSerialPort()
    {
        try
        {
            // Initialise the serial port
            SerialPort = new SerialPort(ComPort, BaudRate);

            SerialPort.ReadTimeout = ReadTimeout;

            SerialPort.WriteTimeout = WriteTimeout;

            // Open the serial port
            SerialPort.Open();

            // Update the gui if applicable
            if (Instance != null && Instance.ComStatusText != null)
            { Instance.ComStatusText.guiText.text = "ComStatus: Open"; }

            if (UpdateMethod == LoopUpdateMethod.Threading)
            {
                // If the thread does not exist then start it
                if (serialThread == null)
                { StartSerialThread(); }
            }

            if (UpdateMethod == LoopUpdateMethod.Coroutine)
            {
                if (isRunning == false)
                {
                    StartSerialCoroutine();
                }
                else
                {
                    isRunning = false;

                    // Give it chance to timeout
                    Thread.Sleep(100);

                    try
                    {
                        // Kill it just in case
                        StopCoroutine("SerialCoroutineLoop");
                    }
                    catch(Exception ex)
                    {
                        print("Error N: " + ex.Message.ToString());
                    }

                    // Restart it once more
                    StartSerialCoroutine();
                }
            }

            print("SerialPort successfully opened!");

        }
        catch (Exception ex)
        {
            // Failed to open com port or start serial thread
            Debug.Log("Error 1: " + ex.Message.ToString());
        }
    }

    /// <summary>
    /// Cloases the serial port so that changes can be made or communication
    /// ended.
    /// </summary>
    public void CloseSerialPort()
    {
        try
        {
            // Close the serial port
            SerialPort.Close();

            // Update the gui if applicable
            if (Instance.ComStatusText != null)
            { Instance.ComStatusText.guiText.text = "ComStatus: Closed"; }
        }
        catch (Exception ex)
        {
            if (SerialPort == null || SerialPort.IsOpen == false)
            {
                // Failed to close the serial port. Uncomment if
                // you wish but this is triggered as the port is
                // already closed and or null.

                // Debug.Log("Error 2A: " + "Port already closed!");
            }
            else
            {
                // Failed to close the serial port
                Debug.Log("Error 2B: " + ex.Message.ToString());
            }
        }

        print("Serial port closed!");
    }

    #endregion Object Serial Port

    #region Serial Coroutine

    /// <summary>
    /// Function used to start coroutine for reading serial
    /// data.
    /// </summary>
    public void StartSerialCoroutine()
    {
        isRunning = true;

        StartCoroutine("SerialCoroutineLoop");
    }

    /// <summary>
    /// A Coroutine used to recieve serial data thus not
    /// affecting generic unity playback etc.
    /// </summary>
    public IEnumerator SerialCoroutineLoop()
    {
        while (isRunning)
        {
            GenericSerialLoop();
            yield return null;
        }

        print("Ending Coroutine!");
    }

    /// <summary>
    /// Function used to stop the coroutine and kill
    /// off any instance
    /// </summary>
    public void StopSerialCoroutine()
    {
        isRunning = false;

        Thread.Sleep(100);

        try
        {
            StopCoroutine("SerialCoroutineLoop");
        }
        catch (Exception ex)
        {
            print("Error 2A: " + ex.Message.ToString());
        }

        // Reset the serial port to null
        if (SerialPort != null)
        { SerialPort = null; }

        // Update the port status... just in case :)
        portStatus = "Ended Serial Loop Coroutine!";

        print("Ended Serial Loop Coroutine!");
    }

    #endregion Serial Coroutine

    #region Serial Thread

    /// <summary>
    /// Function used to start seperate thread for reading serial
    /// data.
    /// </summary>
    public void StartSerialThread()
    {
        try
        {
            // define the thread and assign function for thread loop
            serialThread = new Thread(new ThreadStart(SerialThreadLoop));
            // Boolean used to determine the thread is running
            isRunning = true;
            // Start the thread
            serialThread.Start();

            print("Serial thread started!");
        }
        catch (Exception ex)
        {
            // Failed to start thread
            Debug.Log("Error 3: " + ex.Message.ToString());
        }
    }

    /// <summary>
    /// The serial thread loop. A Seperate thread used to recieve
    /// serial data thus not affecting generic unity playback etc.
    /// </summary>
    private void SerialThreadLoop()
    {
        while (isRunning)
        { GenericSerialLoop(); }

        print("Ending Thread!");
    }

    /// <summary>
    /// Function used to stop the serial thread and kill
    /// off any instance
    /// </summary>
    public void StopSerialThread()
    {
        // Set isRunning to false to let the while loop
        // complete and drop out on next pass
        isRunning = false;

        // Pause a little to let this happen
        Thread.Sleep(100);

        // If the thread still exists kill it
        // A bit of a hack using Abort :p
        if (serialThread != null)
        {
            serialThread.Abort();
            // serialThread.Join();
            Thread.Sleep(100);
            serialThread = null;
        }

        // Reset the serial port to null
        if (SerialPort != null)
        { SerialPort = null; }

        // Update the port status... just in case :)
        portStatus = "Ended Serial Loop Thread";

        print("Ended Serial Loop Thread!");
    }

    #endregion Serial Thread

    #region Static Functions

    /// <summary>
    /// Function used to send string data over serial with
    /// an included line return
    /// </summary>
    /// <param name="data">string</param>
    public void SendSerialDataAsLine(string data)
    {
        if (SerialPort != null)
        { SerialPort.WriteLine(data); }

        print("Sent data: " + data);
    }

    /// <summary>
    /// Function used to send string data over serial without
    /// a line return included.
    /// </summary>
    /// <param name="data"></param>
    public void SendSerialData(string data)
    {
        if (SerialPort != null)
        { SerialPort.Write(data); }

        print("Sent data: " + data);
    }

    #endregion Static Functions

    /// <summary>
    /// The serial thread loop & the coroutine loop both utilise
    /// the same code with the exception of the null return on
    /// the coroutine, so we share it here.
    /// </summary>
    private void GenericSerialLoop()
    {
        try
        {
            // Check that the port is open. If not skip and do nothing
            if (SerialPort.IsOpen)
            {
                // Read serial data until a 'n' character is recieved
                string rData = SerialPort.ReadLine();

                // If the data is valid then do something with it
                if (rData != null && rData != "")
                {
                    // Store the raw data
                    RawData = rData;
                    // split the raw data into chunks via ',' and store it
                    // into a string array
                    ChunkData = RawData.Split(',');

                    // Or you could call a function to do something with
                    // data e.g.
                    ParseSerialData(ChunkData, RawData);
                }
            }
        }
        catch (TimeoutException timeout)
        {
            // This will be triggered lots with the coroutine method
        }
        catch (Exception ex)
        {
            // This could be thrown if we close the port whilst the thread
            // is reading data. So check if this is the case!
            if (SerialPort.IsOpen)
            {
                // Something has gone wrong!
                Debug.Log("Error 4: " + ex.Message.ToString());
            }
            else
            {
                // Error caused by closing the port whilst in use! This is
                // not really an error but uncomment if you wish.

                // Debug.Log("Error 5: Port Closed Exception!");
            }
        }
    }

    /// <summary>
    /// Function used to filter and act upon the data recieved. You can add
    /// bespoke functionality here.
    /// </summary>
    /// <param name="data">string[] of raw data seperated into chunks via ','</param>
    /// <param name="rawData">string of raw data</param>
    private void ParseSerialData(string[] data, string rawData)
    {
        // Examples of reading a value from the recieved data
        // for use if required - remove or replase with bespoke
        // functionality etc

        if (data.Length == 2)
        { int ReceviedValue = int.Parse(data[1]); }
        else { print(rawData); }

        if (data == null || data.Length != 2)
        { print(rawData); }

        // The following can be run if the code is run via the coroutine method.

        //if (RawDataText != null)
        //    RawDataText.guiText.text = RawData;
    }

    /// <summary>
    /// Function that utilises system.io.ports.getportnames() to populate
    /// a list of com ports available on the system.
    /// </summary>
    public void PopulateComPorts()
    {
        // Loop through all available ports and add them to the list
        foreach (string cPort in System.IO.Ports.SerialPort.GetPortNames())
        {
            comPorts.Add(cPort); // Debug.Log(cPort.ToString());
        }

        // Update the port status just in case :)
        portStatus = "ComPort list population complete";
    }

    /// <summary>
    /// Function used to update the current selected com port
    /// </summary>
    public string UpdateComPort()
    {
        // If open close the existing port
        if (SerialPort != null && SerialPort.IsOpen)
        { CloseSerialPort(); }

        // Find the current id of the existing port within the
        // list of available ports
        int currentComPort = comPorts.IndexOf(ComPort);

        // check against the list of ports and get the next one.
        // If we have reached the end of the list then reset to zero.
        if (currentComPort + 1 <= comPorts.Count - 1)
        {
            // Inc the port by 1 to get the next port
            ComPort = (string)comPorts[currentComPort + 1];
        }
        else
        {
            // We have reached the end of the list reset to the
            // first available port.
            ComPort = (string)comPorts[0];
        }

        // Update the port status just in case :)
        portStatus = "ComPort set to: " + ComPort.ToString();

        // Return the new ComPort just in case
        return ComPort;
    }

    /// <summary>
    /// Function used to update the current baudrate
    /// </summary>
    public int UpdateBaudRate()
    {
        // If open close the existing port
        if (SerialPort != null && SerialPort.IsOpen)
        { CloseSerialPort(); }

        // Find the current id of the existing rate within the
        // list of defined baudrates
        int currentBaudRate = baudRates.IndexOf(BaudRate);

        // check against the list of rates and get the next one.
        // If we have reached the end of the list then reset to zero.
        if (currentBaudRate + 1 <= baudRates.Count - 1)
        {
            // Inc the rate by 1 to get the next rate
            BaudRate = (int)baudRates[currentBaudRate + 1];
        }
        else
        {
            // We have reached the end of the list reset to the
            // first available rate.
            BaudRate = (int)baudRates[0];
        }

        // Update the port status just in case :)
        portStatus = "BaudRate set to: " + BaudRate.ToString();

        // Return the new BaudRate just in case
        return BaudRate;
    }
}
Code 3: The full Unity SerialPort Script
If you have any questions or would like more information about this script, please don’t hesitate to contact me via my facebook page.
